本文章仅用于本人学习笔记记录
来源《SpringBoot 源码解读与原理分析》
微信:A20991212A(如本文档内容侵权了您的权益,请您通过微信联系到我)
SpringFramework的手动装配
在原生的 SpringFramework 中,装配组件有三种方式:
- 使用模式注解 @Component 等(Spring2.5+)
- 使用配置类 @Configuration 与 @Bean (Spring3.0+)
- 使用模块装配 @EnableXXX 与 @Import (Spring3.1+)
SpringFramework 提供了模块装配功能,通过给配置类标注 @EnableXXX 注解,再在注解上标注 @Import 注解,即可完成组件装配的效果。
@EnableXXX与@Import的使用
@Import
public @interface Import {

    /**
     * {@link Configuration @Configuration}, {@link ImportSelector},
     * {@link ImportBeanDefinitionRegistrar}, or regular component classes to import.
     */
    Class<?>[] value();

}
@Import value中写的很明白了,可以导入配置类、ImportSelector 的实现类,ImportBeanDefinitionRegistrar 的实现类,或者普通类。
例子
创建几个颜色的实体类,如Red,Yellow,Blue,Green,Black等。
新建 @EnableColor 注解:
@Documented
@Retention(RetentionPolicy.RUNTIME)
@Target(ElementType.TYPE)
public @interface EnableColor {

}
导入普通类
直接在 @Import 注解中标注Red类:
@Import({Red.class})
public @interface EnableColor {

}
之后启动类标注 @EnableColor,引导启动IOC容器:
@EnableColor
@Configuration
public class ColorConfiguration {

}

public class App {
    public static void main(String[] args) throws Exception {
        AnnotationConfigApplicationContext ctx = new AnnotationConfigApplicationContext(ColorConfiguration.class);
        String[] beanDefinitionNames = ctx.getBeanDefinitionNames();
        Stream.of(beanDefinitionNames).forEach(System.out::println);
    }
}
控制台打印:
org.springframework.context.annotation.internalConfigurationAnnotationProcessor
org.springframework.context.annotation.internalAutowiredAnnotationProcessor
org.springframework.context.annotation.internalCommonAnnotationProcessor
org.springframework.context.event.internalEventListenerProcessor
org.springframework.context.event.internalEventListenerFactory
colorConfiguration
com.example.demo.enablexxx.Red
可见Red类已经被注册。
导入配置类
新建 ColorRegistrarConfiguration,并标注 @Configuration :
@Configuration
public class ColorRegistrarConfiguration {

    @Bean
    public Yellow yellow() {
        return new Yellow();
    }

}
之后在 @EnableColor 的 @Import 注解中加入 ColorRegistrarConfiguration:
@Import({Red.class, ColorRegistrarConfiguration.class})
public @interface EnableColor {

}
控制台打印:
org.springframework.context.annotation.internalConfigurationAnnotationProcessor
org.springframework.context.annotation.internalAutowiredAnnotationProcessor
org.springframework.context.annotation.internalCommonAnnotationProcessor
org.springframework.context.event.internalEventListenerProcessor
org.springframework.context.event.internalEventListenerFactory
colorConfiguration
com.example.demo.enablexxx.Red
com.example.demo.enablexxx.ColorRegistrarConfiguration
yellow
可见配置类 ColorRegistrarConfiguration 和 Yellow 都已注册到IOC容器中。
导入ImportSelector
新建 ColorImportSelector,实现 ImportSelector 接口:
public class ColorImportSelector implements ImportSelector {

    @Override
    public String[] selectImports(AnnotationMetadata importingClassMetadata) {
        return new String[] {Blue.class.getName(), Green.class.getName()};
    }

}
之后在 @EnableColor 的 @Import 注解中加入 ColorImportSelector:
@Import({Red.class, ColorRegistrarConfiguration.class, ColorImportSelector.class})
public @interface EnableColor {

}
控制台打印:
org.springframework.context.annotation.internalConfigurationAnnotationProcessor
org.springframework.context.annotation.internalAutowiredAnnotationProcessor
org.springframework.context.annotation.internalCommonAnnotationProcessor
org.springframework.context.event.internalEventListenerProcessor
org.springframework.context.event.internalEventListenerFactory
colorConfiguration
com.example.demo.enablexxx.Red
com.example.demo.enablexxx.ColorRegistrarConfiguration
yellow
com.example.demo.enablexxx.Blue
com.example.demo.enablexxx.Green
ColorImportSelector 没有注册到IOC容器中,两个新的颜色类被注册。
导入ImportBeanDefinitionRegistrar
新建 ColorImportBeanDefinitionRegistrar,实现 ImportBeanDefinitionRegistrar 接口:
public class ColorImportBeanDefinitionRegistrar implements ImportBeanDefinitionRegistrar {

    @Override
    public void registerBeanDefinitions(AnnotationMetadata importingClassMetadata, BeanDefinitionRegistry registry) {
        registry.registerBeanDefinition("black", new RootBeanDefinition(Black.class));
    }

}
之后在 @EnableColor 的 @Import 注解中加入 ColorImportBeanDefinitionRegistrar:
@Import({Red.class, ColorRegistrarConfiguration.class, ColorImportSelector.class, ColorImportBeanDefinitionRegistrar.class})
public @interface EnableColor {

}
控制台打印:
org.springframework.context.annotation.internalConfigurationAnnotationProcessor
org.springframework.context.annotation.internalAutowiredAnnotationProcessor
org.springframework.context.annotation.internalCommonAnnotationProcessor
org.springframework.context.event.internalEventListenerProcessor
org.springframework.context.event.internalEventListenerFactory
colorConfiguration
com.example.demo.enablexxx.Red
com.example.demo.enablexxx.ColorRegistrarConfiguration
yellow
com.example.demo.enablexxx.Blue
com.example.demo.enablexxx.Green
black
由于在注册Black的时候要指定Bean的id,而上面已经标明了使用 “black” 作为id,故打印的 beanDefinitionName 就是black。
SpringBoot的自动装配
SpringBoot的自动配置完全由 @EnableAutoConfiguration 开启。
@EnableAutoConfiguration 的内容:
@AutoConfigurationPackage
@Import(AutoConfigurationImportSelector.class)
public @interface EnableAutoConfiguration
文档注释原文翻译:(文档注释很长,但句句精华)
启用Spring-ApplicationContext的自动配置,并且会尝试猜测和配置您可能需要的Bean。通常根据您的类路径和定义的Bean来应用自动配置类。例如,如果您的类路径上有 tomcat-embedded.jar,则可能需要 TomcatServletWebServerFactory (除非自己已经定义了 ServletWebServerFactory 的Bean)。
使用 @SpringBootApplication 时,将自动启用上下文的自动配置,因此再添加该注解不会产生任何其他影响。
自动配置会尝试尽可能地智能化,并且在您定义更多自定义配置时会自动退出(被覆盖)。您始终可以手动排除掉任何您不想应用的配置(如果您无法访问它们,请使用 excludeName() 方法),您也可以通过 spring.autoconfigure.exclude 属性排除它们。自动配置始终在注册用户自定义的Bean之后应用。
通常被 @EnableAutoConfiguration 标注的类(如 @SpringBootApplication)的包具有特定的意义,通常被用作“默认值”。例如,在扫描@Entity类时将使用它。通常建议您将 @EnableAutoConfiguration(如果您未使用 @SpringBootApplication)放在根包中,以便可以搜索所有包及子包下的类。
自动配置类也是常规的Spring配置类。它们使用 SpringFactoriesLoader 机制定位(针对此类)。通常自动配置类也是 @Conditional Bean(最经常的情况下是使用 @ConditionalOnClass 和 @ConditionalOnMissingBean 标注)。
@EnableAutoConfiguration 是一个组合注解,分别来看:
@AutoConfigurationPackage
@Import(AutoConfigurationPackages.Registrar.class)
public @interface AutoConfigurationPackage
文档注释原文翻译:
Indicates that the package containing the annotated class should be registered with AutoConfigurationPackages.
表示包含该注解的类所在的包应该在 AutoConfigurationPackages 中注册。
我们从一开始学 SpringBoot 就知道一件事:主启动类必须放在所有自定义组件的包的最外层,以保证Spring能扫描到它们。由此可知是它起的作用。
它的实现原理是在注解上标注了 @Import,导入了一个 AutoConfigurationPackages.Registrar 。
AutoConfigurationPackages.Registrar
/**
* {@link ImportBeanDefinitionRegistrar} to store the base package from the importing
* configuration.
*/
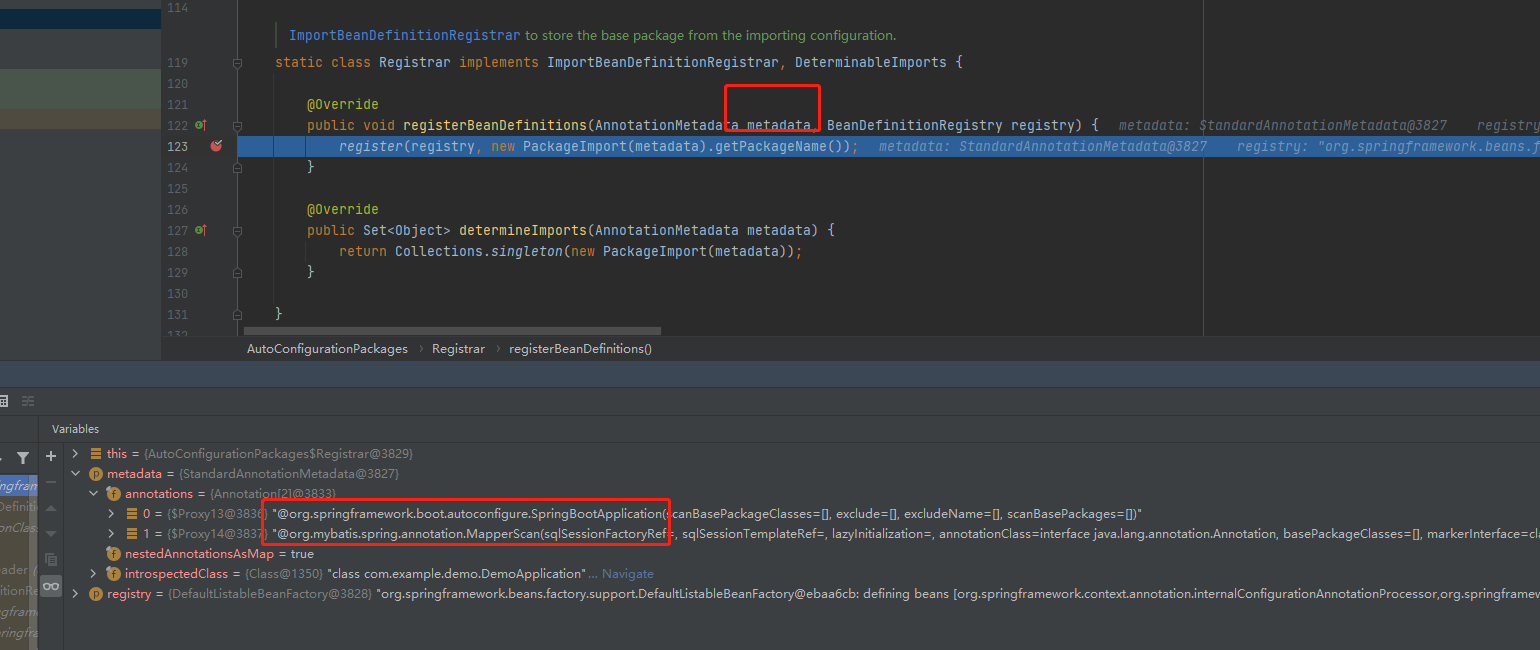
static class Registrar implements ImportBeanDefinitionRegistrar, DeterminableImports {
@Override
public void registerBeanDefinitions(AnnotationMetadata metadata, BeanDefinitionRegistry registry) {
register(registry, new PackageImport(metadata).getPackageName());
}
@Override
public Set<Object> determineImports(AnnotationMetadata metadata) {
return Collections.singleton(new PackageImport(metadata));
}
}文档注释原文翻译:
ImportBeanDefinitionRegistrar to store the base package from the importing configuration.
用于保存导入的配置类所在的根包。
很明显,它就是实现把主配置所在根包保存起来以便后期扫描用的。分析源码:
Registrar 实现了 ImportBeanDefinitionRegistrar 接口,它向IOC容器中要手动注册组件。
在重写的 registerBeanDefinitions 方法中,它要调用外部类 AutoConfigurationPackages 的register方法。
实例化的 PackageImport 对象的构造方法:
PackageImport(AnnotationMetadata metadata) {
    this.packageName = ClassUtils.getPackageName(metadata.getClassName());
}
它取了一个 metadata 的所在包名。那 metadata 又是什么呢?
翻看 ImportBeanDefinitionRegistrar 的文档注释:
public interface ImportBeanDefinitionRegistrar {
    /**
     * ......
     * @param importingClassMetadata annotation metadata of the importing class
     * @param registry current bean definition registry
     */
    void registerBeanDefinitions(AnnotationMetadata importingClassMetadata, BeanDefinitionRegistry registry);
}
注意 importingClassMetadata 的参数说明:导入类的注解元数据。
它实际代表的是被 @Import 标记的类的信息。
那在 SpringBoot 的主启动类中,被标记的肯定就是最开始案例里的 DemoApplication。
也就是说它是 DemoApplication 的类信息,那获取它的包名就是获取主启动类的所在包。
register方法
private static final String BEAN = AutoConfigurationPackages.class.getName();

public static void register(BeanDefinitionRegistry registry, String... packageNames) {
    // 判断 BeanFactory 中是否包含 AutoConfigurationPackages
    if (registry.containsBeanDefinition(BEAN)) {
        BeanDefinition beanDefinition = registry.getBeanDefinition(BEAN);
        ConstructorArgumentValues constructorArguments = beanDefinition.getConstructorArgumentValues();
        // addBasePackages:添加根包扫描包
        constructorArguments.addIndexedArgumentValue(0, addBasePackages(constructorArguments, packageNames));
    }
    else {
        GenericBeanDefinition beanDefinition = new GenericBeanDefinition();
        beanDefinition.setBeanClass(BasePackages.class);
        beanDefinition.getConstructorArgumentValues().addIndexedArgumentValue(0, packageNames);
        beanDefinition.setRole(BeanDefinition.ROLE_INFRASTRUCTURE);
        registry.registerBeanDefinition(BEAN, beanDefinition);
    }
}
划重点:它要判断当前IOC容器中是否包含 AutoConfigurationPackages 。如果有,就会拿到刚才传入的包名,设置到一个 basePackage 里面!basePackage 的意义很明显是根包。
换句话说,它要取主启动类所在包及子包下的组件。
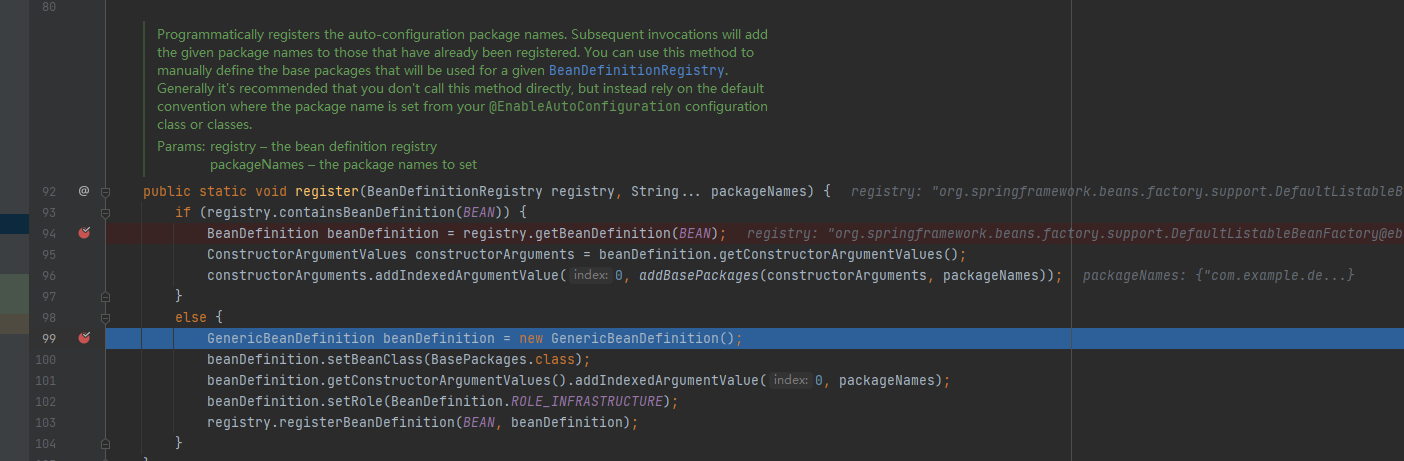
不过,在实际Debug时,并不是走的上面流程,因为 AutoConfigurationPackages 对应的 Bean 还没有创建,所以走的下面的 else 部分,直接把主启动类所在包放入 BasePackages 中,与上面 if 结构中最后一句一样,都是调用 addIndexedArgumentValue 方法。那这个 BasePackages 中设置了构造器参数,一定会有对应的成员:
static final class BasePackages {

    private final List<String> packages;

    BasePackages(String... names) {
        List<String> packages = new ArrayList<>();
        for (String name : names) {
            if (StringUtils.hasText(name)) {
                packages.add(name);
            }
        }
        this.packages = packages;
    }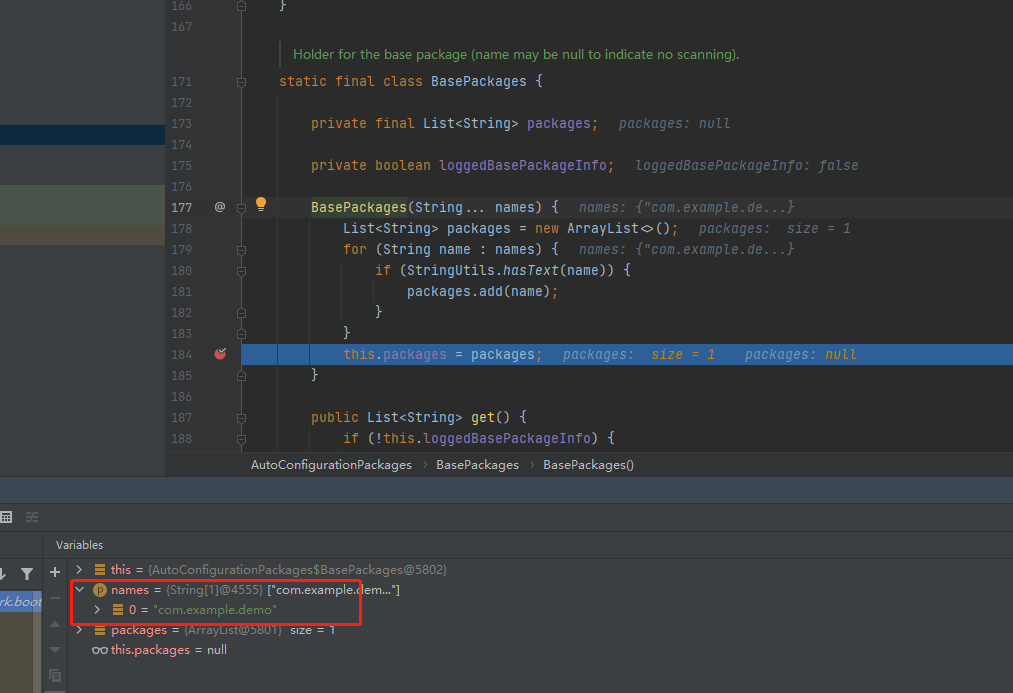
basePackage的作用
如果这个 basePackage 的作用仅仅是提供给 SpringFramework 和 SpringBoot 的内部使用,那这个设计似乎有一点多余。回想一下,SpringBoot 的强大之处,有一点就是整合第三方技术可以非常的容易。以咱最熟悉的 MyBatis 为例,咱看看 basePackage 如何在整合第三方技术时被利用。
引入 mybatis-spring-boot-starter 依赖后,可以在 IDEA 中打开 MyBatisAutoConfiguration 类。在这个配置类中,咱可以找到这样一个组件:AutoConfiguredMapperScannerRegistrar
public static class AutoConfiguredMapperScannerRegistrar implements BeanFactoryAware, ImportBeanDefinitionRegistrar {

    private BeanFactory beanFactory;

    @Override
    public void registerBeanDefinitions(AnnotationMetadata importingClassMetadata, BeanDefinitionRegistry registry) {
        if (!AutoConfigurationPackages.has(this.beanFactory)) {
            logger.debug("Could not determine auto-configuration package, automatic mapper scanning disabled.");
            return;
        }
        logger.debug("Searching for mappers annotated with @Mapper");

        List<String> packages = AutoConfigurationPackages.get(this.beanFactory);
        // logger ......
        // 注册Mapper ......
    }
看类名也能看的出来,它是扫描 Mapper 并注册到 IOC 容器的 ImportBeanDefinitionRegistrar !那这里头,取扫描根包的动作就是 AutoConfigurationPackages.get(this.beanFactory) ,由此就可以把事先准备好的 basePackages 都拿出来,之后进行扫描。
也解释了为什么 SpringBoot 的启动器一定要在所有类的最外层。
@Import(AutoConfigurationImportSelector.class)
它导入了一个 ImportSelector,来向容器中导入组件。导入的组件是:AutoConfigurationImportSelector
AutoConfigurationImportSelector
public class AutoConfigurationImportSelector implements DeferredImportSelector, BeanClassLoaderAware,
        ResourceLoaderAware, BeanFactoryAware, EnvironmentAware, Ordered
文档注释原文翻译:
DeferredImportSelector to handle auto-configuration. This class can also be subclassed if a custom variant of @EnableAutoConfiguration is needed.
DeferredImportSelector 处理自动配置。如果需要自定义扩展 @EnableAutoConfiguration,则也可以编写该类的子类。
DeferredImportSelector
public interface DeferredImportSelector extends ImportSelector它是 ImportSelector 的子接口,它的文档注释原文和翻译:
ImportSelector 的一种扩展,在处理完所有 @Configuration 类型的Bean之后运行。当所选导入为 @Conditional 时,这种类型的选择器特别有用。
实现类还可以扩展 Ordered 接口,或使用 @Order 注解来指示相对于其他 DeferredImportSelector 的优先级。
实现类也可以提供导入组,该导入组可以提供跨不同选择器的其他排序和筛选逻辑。
DeferredImportSelector 的执行时机,是在 @Configuration 注解中的其他逻辑被处理完毕之后(包括对 @ImportResource、@Bean 这些注解的处理)再执行,换句话说,DeferredImportSelector 的执行时机比 ImportSelector 更晚。
AutoConfigurationImportSelector,它的核心部分,就是 ImportSelector 的 selectImport 方法:
@Override
public String[] selectImports(AnnotationMetadata annotationMetadata) {
    if (!isEnabled(annotationMetadata)) {
        return NO_IMPORTS;
    }

    AutoConfigurationMetadata autoConfigurationMetadata = AutoConfigurationMetadataLoader
            .loadMetadata(this.beanClassLoader);
    // 加载自动配置类
    AutoConfigurationEntry autoConfigurationEntry = getAutoConfigurationEntry(autoConfigurationMetadata,
            annotationMetadata);
    return StringUtils.toStringArray(autoConfigurationEntry.getConfigurations());
}
关键的源码在 getAutoConfigurationEntry(autoConfigurationMetadata, annotationMetadata) :
getAutoConfigurationEntry(autoConfigurationMetadata, annotationMetadata)
/**
 * Return the {@link AutoConfigurationEntry} based on the {@link AnnotationMetadata}
 * of the importing {@link Configuration @Configuration} class.
 *
 * 根据导入的@Configuration类的AnnotationMetadata返回AutoConfigurationImportSelector.AutoConfigurationEntry。
 */
protected AutoConfigurationEntry getAutoConfigurationEntry(AutoConfigurationMetadata autoConfigurationMetadata,
         AnnotationMetadata annotationMetadata) {
    if (!isEnabled(annotationMetadata)) {
        return EMPTY_ENTRY;
    }
    AnnotationAttributes attributes = getAttributes(annotationMetadata);
    // 【核心】加载候选的自动配置类
    List<String> configurations = getCandidateConfigurations(annotationMetadata, attributes);
    configurations = removeDuplicates(configurations);
    Set<String> exclusions = getExclusions(annotationMetadata, attributes);
    checkExcludedClasses(configurations, exclusions);
    configurations.removeAll(exclusions);
    configurations = filter(configurations, autoConfigurationMetadata);
    fireAutoConfigurationImportEvents(configurations, exclusions);
    return new AutoConfigurationEntry(configurations, exclusions);
}
这个方法里有一个非常关键的集合:configurations(最后直接拿他来返回出去了,给 selectImports 方法转成 String[])。
这个 configurations 集合的数据,都是通过 getCandidateConfigurations 方法来获取:
protected Class<?> getSpringFactoriesLoaderFactoryClass() {
    return EnableAutoConfiguration.class;
}

protected List<String> getCandidateConfigurations(AnnotationMetadata metadata, AnnotationAttributes attributes) {
    // SPI机制加载自动配置类
    List<String> configurations = SpringFactoriesLoader.loadFactoryNames(getSpringFactoriesLoaderFactoryClass(),
             getBeanClassLoader());
    Assert.notEmpty(configurations, "No auto configuration classes found in META-INF/spring.factories. If you "
             + "are using a custom packaging, make sure that file is correct.");
    return configurations;
}
这个方法又调用了 SpringFactoriesLoader.loadFactoryNames 方法,传入的Class就是 @EnableAutoConfiguration
SpringFactoriesLoader.loadFactoryNames
public static final String FACTORIES_RESOURCE_LOCATION = "META-INF/spring.factories";

public static List<String> loadFactoryNames(Class<?> factoryClass, @Nullable ClassLoader classLoader) {
    String factoryClassName = factoryClass.getName();
    //     ↓ ↓ ↓ ↓ ↓ ↓ ↓ ↓ ↓ ↓ ↓ ↓ ↓ ↓ ↓ ↓
    return loadSpringFactories(classLoader).getOrDefault(factoryClassName, Collections.emptyList());
}

private static Map<String, List<String>> loadSpringFactories(@Nullable ClassLoader classLoader) {
    MultiValueMap<String, String> result = cache.get(classLoader);
    if (result != null) {
        return result;
    }

    try {
        // ↓ ↓ ↓ ↓ ↓ ↓ ↓ ↓ ↓ ↓ ↓ ↓ ↓ ↓ ↓ ↓ ↓ ↓ ↓ ↓ ↓ ↓
        Enumeration<URL> urls = (classLoader != null ?
                 classLoader.getResources(FACTORIES_RESOURCE_LOCATION) :
                 ClassLoader.getSystemResources(FACTORIES_RESOURCE_LOCATION));
        result = new LinkedMultiValueMap<>();
        while (urls.hasMoreElements()) {
            URL url = urls.nextElement();
            UrlResource resource = new UrlResource(url);
            Properties properties = PropertiesLoaderUtils.loadProperties(resource);
            for (Map.Entry<?, ?> entry : properties.entrySet()) {
                String factoryClassName = ((String) entry.getKey()).trim();
                for (String factoryName : StringUtils.commaDelimitedListToStringArray((String) entry.getValue())) {
                    result.add(factoryClassName, factoryName.trim());
                }
            }
        }
        cache.put(classLoader, result);
        return result;
    }
    catch (IOException ex) {
        throw new IllegalArgumentException("Unable to load factories from location [" +
                                       FACTORIES_RESOURCE_LOCATION + "]", ex);
    }
}
源码中使用 classLoader 去加载了指定常量路径下的资源: FACTORIES_RESOURCE_LOCATION ,而这个常量指定的路径实际是:META-INF/spring.factories 。
这个文件在 spring-boot-autoconfiguration 包下可以找到。
spring-boot-autoconfiguration 包下 META-INF/spring.factories 节选:
# Initializers
org.springframework.context.ApplicationContextInitializer=\
org.springframework.boot.autoconfigure.SharedMetadataReaderFactoryContextInitializer,\
org.springframework.boot.autoconfigure.logging.ConditionEvaluationReportLoggingListener

# Application Listeners
org.springframework.context.ApplicationListener=\
org.springframework.boot.autoconfigure.BackgroundPreinitializer

# Auto Configuration Import Listeners
org.springframework.boot.autoconfigure.AutoConfigurationImportListener=\
org.springframework.boot.autoconfigure.condition.ConditionEvaluationReportAutoConfigurationImportListener

# Auto Configuration Import Filters
org.springframework.boot.autoconfigure.AutoConfigurationImportFilter=\
org.springframework.boot.autoconfigure.condition.OnBeanCondition,\
org.springframework.boot.autoconfigure.condition.OnClassCondition,\
org.springframework.boot.autoconfigure.condition.OnWebApplicationCondition

# Auto Configure
org.springframework.boot.autoconfigure.EnableAutoConfiguration=\
org.springframework.boot.autoconfigure.admin.SpringApplicationAdminJmxAutoConfiguration,\
org.springframework.boot.autoconfigure.aop.AopAutoConfiguration,\
org.springframework.boot.autoconfigure.amqp.RabbitAutoConfiguration,\
org.springframework.boot.autoconfigure.batch.BatchAutoConfiguration,\
org.springframework.boot.autoconfigure.cache.CacheAutoConfiguration,\
......
之后拿到这个资源文件,以 Properties 的形式加载,并取出 org.springframework.boot.autoconfigure.EnableAutoConfiguration 指定的所有自动配置类(是一个很大的字符串,里面都是自动配置类的全限定类名),装配到IOC容器中,之后自动配置类就会通过 ImportSelector 和 @Import 的机制被创建出来,之后就生效了。
这也就解释了为什么 即便没有任何配置文件,SpringBoot的Web应用都能正常运行。
从上面的 Properties 中发现,所有配置的 EnableAutoConfiguration 的自动配置类,都以 AutoConfiguration 结尾!由此规律,以后我们要了解一个 SpringBoot 的模块或者第三方集成的模块时,就可以大胆猜测基本上一定会有 XXXAutoConfiguration 类出现!
SpringBoot使用的工厂机制
SpringBoot 在非常多的位置都利用类似于上面 “通过读取 spring.factories 加载一组预先配置的类” 的机制,而这个机制的核心源码来自 SpringFactoriesLoader 。
package org.springframework.core.io.support;

/**
 * ......
 *
 * @since 3.2
 */
public final class SpringFactoriesLoader
我们发现它不是来自 SpringBoot,而是在 SpringFramework3.2 就已经有了的类。它的文档注释原文翻译:
它是一个框架内部内部使用的通用工厂加载机制。
SpringFactoriesLoader 从 META-INF/spring.factories 文件中加载并实例化给定类型的工厂,这些文件可能存在于类路径中的多个jar包中。spring.factories 文件必须采用 properties 格式,其中key是接口或抽象类的全限定名,而value是用逗号分隔的实现类的全限定类名列表。
例如:example.MyService=example.MyServiceImpl1,example.MyServiceImpl2
其中 example.MyService 是接口的名称,而 MyServiceImpl1 和 MyServiceImpl2 是两个该接口的实现类。
到这里已经能够发现,这个思路跟Java原生的SPI非常类似。
Java的SPI
SPI全称为 Service Provider Interface,是jdk内置的一种服务提供发现机制。简单来说,它就是一种动态替换发现的机制。
SPI规定,所有要预先声明的类都应该放在 META-INF/services 中。配置的文件名是接口/抽象类的全限定名,文件内容是抽象类的子类或接口的实现类的全限定类名,如果有多个,借助换行符,一行一个。
举个例子:
在 META-INF/services 中声明一个文件名为 com.linkedbear.boot.demo.SpiDemoInterface 的文件,文件内容为:
com.linkedbear.boot.demo.SpiDemoInterfaceImpl在 com.linkedbear.boot.demo 包下新建一个接口,类名必须跟上面配置的文件名一样:SpiDemoInterface。在接口中声明一个 test() 方法:
public interface SpiDemoInterface {
    void test();
}
接下来再新建一个类 SpiDemoInterfaceImpl,并实现 SpiDemoInterface:
public class SpiDemoInterfaceImpl implements SpiDemoInterface {
    @Override
    public void test() {
        System.out.println("SpiDemoInterfaceImpl#test() run...");
    }
}
编写主运行类,测试效果:
public class App {
    public static void main(String[] args) {
        ServiceLoader<SpiDemoInterface> loaders = ServiceLoader.load(SpiDemoInterface.class);
        loaders.foreach(SpiDemoInterface::test);
    }
}
运行结果:
SpiDemoInterfaceImpl#test() run...SpringFramework的SpringFactoriesLoader
SpringFramework 利用 SpringFactoriesLoader 都是调用 loadFactoryNames 方法:
public static List<String> loadFactoryNames(Class<?> factoryClass, @Nullable ClassLoader classLoader) {
    String factoryClassName = factoryClass.getName();
    return loadSpringFactories(classLoader).getOrDefault(factoryClassName, Collections.emptyList());
}
文档注释原文翻译:
使用给定的类加载器从 META-INF/spring.factories 中加载给定类型的工厂实现的全限定类名。
loadSpringFactories
public static final String FACTORIES_RESOURCE_LOCATION = "META-INF/spring.factories";

private static final Map<ClassLoader, MultiValueMap<String, String>> cache = new ConcurrentReferenceHashMap<>();

// 这个方法仅接收了一个类加载器
private static Map<String, List<String>> loadSpringFactories(@Nullable ClassLoader classLoader) {
    MultiValueMap<String, String> result = cache.get(classLoader);
    if (result != null) {
        return result;
    }

    try {
        Enumeration<URL> urls = (classLoader != null ?
                 classLoader.getResources(FACTORIES_RESOURCE_LOCATION) :
                 ClassLoader.getSystemResources(FACTORIES_RESOURCE_LOCATION));
        result = new LinkedMultiValueMap<>();
        while (urls.hasMoreElements()) {
            URL url = urls.nextElement();
            UrlResource resource = new UrlResource(url);
            Properties properties = PropertiesLoaderUtils.loadProperties(resource);
            for (Map.Entry<?, ?> entry : properties.entrySet()) {
                String factoryClassName = ((String) entry.getKey()).trim();
                for (String factoryName : StringUtils.commaDelimitedListToStringArray((String) entry.getValue())) {
                    result.add(factoryClassName, factoryName.trim());
                }
            }
        }
        cache.put(classLoader, result);
        return result;
    }
    catch (IOException ex) {
        throw new IllegalArgumentException("Unable to load factories from location [" +
                                       FACTORIES_RESOURCE_LOCATION + "]", ex);
    }
}
加载spring.factories
        Enumeration<URL> urls = (classLoader != null ?
                 classLoader.getResources(FACTORIES_RESOURCE_LOCATION) :
                 ClassLoader.getSystemResources(FACTORIES_RESOURCE_LOCATION));
        result = new LinkedMultiValueMap<>();
这部分动作就是获取当前 classpath 下所有jar包中有的 spring.factories 文件,并将它们加载到内存中。
总结
- SpringFramework 提供了模式注解、@EnableXXX + @Import 的组合手动装配。
- @SpringBootApplication 标注的主启动类所在包会被视为扫描包的根包。
- AutoConfigurationImportSelector 配合 SpringFactoriesLoader 可加载 “META-INF/spring.factories” 中配置的 @EnableAutoConfiguration 对应的自动配置类。
- DeferredImportSelector 的执行时机比 ImportSelector 更晚。
- SpringFramework 实现了自己的SPI技术,相比较于Java原生的SPI更灵活。